
Breakfast & Brunch
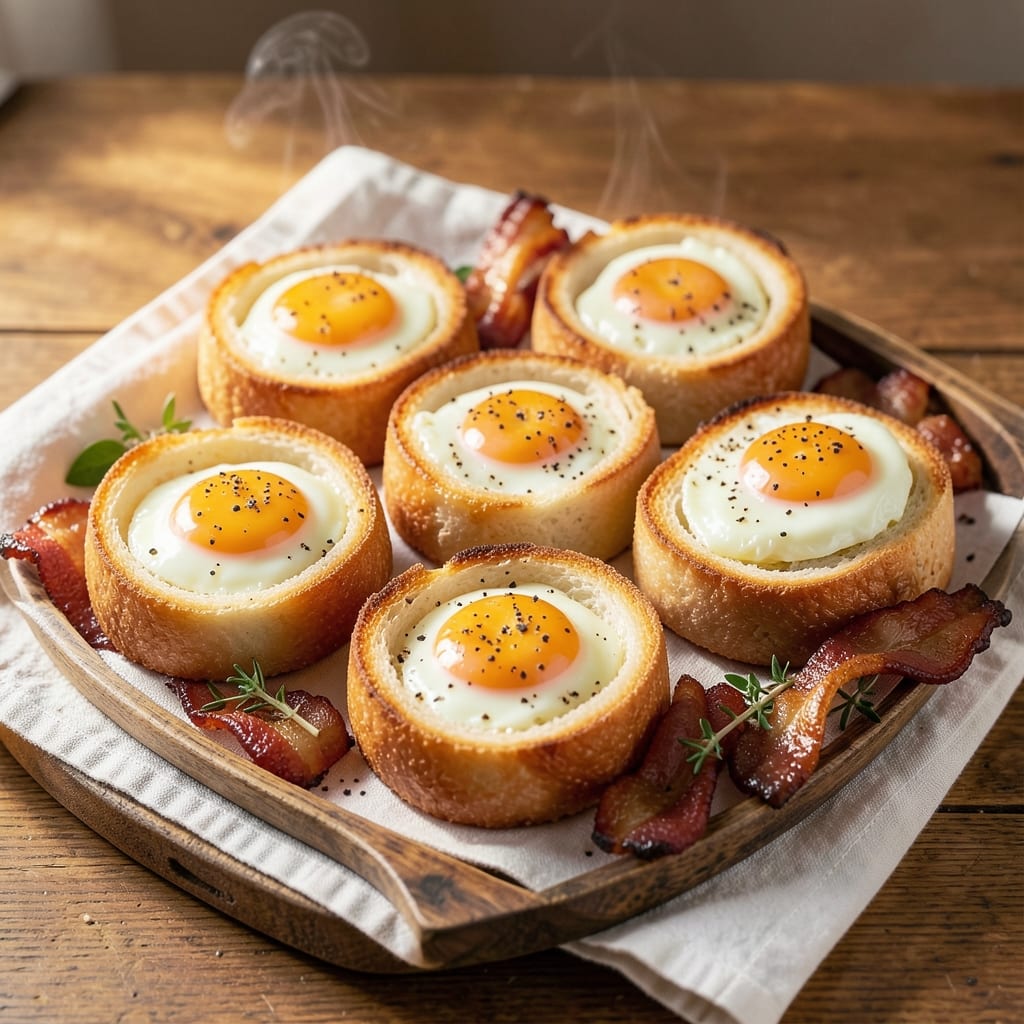
This bacon egg and toast cups recipe transforms breakfast into a handheld masterpiece with crispy edges and golden yolk rivers. The secret lies in perfectly cooked bacon, tender eggs, and sturdy toast strips that hold up to every bite—no soggy corners here. I developed this after burning through three failed attempts (yes, I learned the hard way), and now it’s my go-to for brunch on the go or lazy weekend mornings.
The beauty of these cups is their balance: crispy bacon adds smoky depth, runny yolks bring richness, and toast strips provide structure without sacrificing texture. You’ll assemble everything in muffin tins for easy transport, and the best part? They reheat beautifully—ideal for meal prep or feeding a crowd. No fancy equipment needed, just a few simple techniques to nail the crispy factor every time.
What you’ll end up with is a breakfast that’s equal parts indulgent and practical—each cup packed with savory, salty, and buttery layers. The toast strips stay sturdy enough to hold the filling, while the eggs remain perfectly runny at the center. This isn’t just breakfast; it’s a foolproof way to elevate your morning routine without sacrificing flavor or convenience.
Perfect for brunch gatherings, office lunches, or a solo treat, these cups are designed to impress. The assembly process is straightforward, and with a little planning, you can prep ahead and enjoy them cold or warmed up. Here’s how to make them—crispy, golden, and impossible to resist.
Ingredients for bacon egg and toast cups
Crispy bacon, runny yolks, and sturdy toast strips—here’s what makes these handheld cups irresistible.
| Ingredient | Amount | Notes |
|---|---|---|
| Bacon 🥓 | 8 oz | Thick-cut, cut into strips |
| Large Eggs 🥚 | 12 whole | Room temperature preferred |
| White Bread 🍞 | 1 loaf | Crusts removed, sturdy variety |
| Unsalted Butter 🧈 | ½ cup | Melted for brushing |
| Salt 🧂 | 1 ½ tsp | Kosher or sea salt |
| Black Pepper 🌶️ | ½ tsp | Freshly ground preferred |
| Vegetable Oil 🫒 | 2 tbsp | For greasing muffin tin |
| Garlic Powder 🧄 | ½ tsp | Optional for flavor boost |
| Paprika 🌶️ | ¼ tsp | Smoked for garnish |
| Muffin Tin 🍳 | 12 whole | Standard size, 12 cups |
| Aluminum Foil 📄 | 1 sheet | For easy removal |
Thick-cut bacon is a game-changer here—Costco or Trader Joe's have the best pre-sliced strips, but any good-quality bacon works. Look for slices with good marbling to stay crispy. The bread matters too: sourdough or a sturdy white loaf holds up better than soft sandwich bread. I always grab a loaf from Whole Foods or the bakery section at Kroger—just make sure it’s fresh. For the eggs, room temperature is key (takes 10 minutes), but if you’re in a rush, cold eggs still work—they’ll just take a second longer to cook through.
No thick-cut bacon? Regular bacon cut into strips works, but it’ll be slightly less crispy. Short on bread? Brioche or a good-quality baguette adds extra richness. The butter is non-negotiable for brushing—don’t use margarine. Want more flavor? Add a pinch of garlic powder or onion powder to the egg mixture. For the muffin tin, grease it well with vegetable oil or butter—this keeps the toast strips from sticking. If you’re prepping ahead, assemble everything except the eggs and store in the fridge for up to 4 hours before baking.
These cups reheat beautifully—pop them in the oven at 350°F for 5-7 minutes to revive that crispy texture. Store leftovers in an airtight container for 2 days or freeze for 1 month. I always double the batch and freeze half—perfect for lazy mornings. For serving, line a tray with foil, then use it to lift the cups out of the tin. No mess, just crispy perfection.
Why You'll Love This Recipe
- No Fuss Breakfast: I swear, this takes less time than deciding what to eat—just fry the bacon, butter the bread, crack eggs into the cups, and bake. The bread soaks up all that salty, smoky goodness while the eggs cook perfectly. Honestly, I’ve made it in my pajamas.
- Crispy Crunch Magic: That buttery toast cup? It’s the star. The edges get golden and crunchy while the center stays soft, holding the creamy egg and crispy bacon like a little edible hug. Between us, the first bite makes me want to skip the rest of breakfast.
- Lunchbox Hero: Pack these for work or school—no reheating needed. The bread stays sturdy, the egg stays warmish, and the bacon? Still addictively crisp. My son takes his to soccer practice; I take mine to meetings. Zero complaints, just empty plates.
- Pantry Staple Power: Five ingredients, zero specialty items. You’ve got bacon, eggs, and bread? You’ve got a meal. I’ve fed a crowd with this, used leftovers for a quick dinner, and even turned extras into a sloppy but satisfying sandwich. Budget-friendly doesn’t get much better than this.
Step-by-step instructions for bacon egg and toast cups
Here's how to build these handheld breakfast gems with perfect crispy edges and runny yolks.
Cook the Bacon to Crispy Perfection
Preheat your oven to 400°F and line a baking sheet with the aluminum foil. Arrange the 8 oz bacon strips in a single layer, not overlapping. Bake for 15-18 minutes until the edges are deep golden brown and the bacon is fully cooked. Flip halfway through for even cooking.
Watch for those edges to curl and crisp—this is your signal to flip. Once done, transfer the bacon to paper towels to drain excess fat. I like to leave them slightly crispy but not brittle, as they'll soften slightly when assembled. Let them cool for 5 minutes before using.
Prepare the Toast Cups
Cut the 1 loaf white bread into 12 equal squares using a sharp knife. Remove the crusts completely—this ensures even cooking and crispy edges. Brush each square generously with the 0.5 cup melted unsalted butter, coating both sides thoroughly. The butter creates that golden crust we're after.
Lightly grease the 12 whole muffin tin with 1 tablespoon vegetable oil, then press each buttered bread square into a muffin cup, pressing gently to create a tight cup shape. Sprinkle the bottom of each cup with a pinch of 1.5 tsp salt and 0.5 tsp black pepper. This seasoning will flavor the entire cup as it bakes.
Assemble the Breakfast Cups
Crack one large egg into each toast cup, being careful not to break the yolks. I use my fingers to gently press the egg into the cup so it sits flat. Sprinkle each egg with a tiny pinch of 0.5 tsp garlic powder and 0.25 tsp paprika—this adds subtle depth to every bite. Place the muffin tin on a baking sheet lined with aluminum foil for easy cleanup.
Add a strip of the cooled bacon to each cup, arranging it around the egg. The bacon should sit snugly against the toast edges. I like to press down very gently so the bacon stays in place during baking. This arrangement ensures every bite has that perfect balance of crispy, creamy, and smoky flavors.
Bake to Golden Crispiness
Bake at 375°F for 12-15 minutes until the toast edges are deep golden brown and the egg whites are set but the yolks remain runny. You'll know they're perfect when the edges look crisp and the tops have a slight puff. The yolks should still jiggle slightly when you gently shake the muffin tin.
Here's the thing—don't overbake. The yolks need to stay runny for that classic egg-in-toast experience. If you see the yolks starting to set too quickly, pull them out sooner. Let them rest for 2 minutes after baking before serving to allow the yolks to settle slightly while maintaining that perfect runny center.
Pro Tips For Making Bacon Egg And Toast Cups
- USE A MUFFIN TIN: Cook the bacon and eggs directly in a greased muffin tin—no muffin liners needed. The ridges help hold the toast cups in place while the bacon and egg cook evenly, and cleanup is a breeze since everything stays contained.
- CUT TOAST CUPS THICK: Slice the bread into ½-inch-thick rounds instead of thin slices. Thicker toast cups hold up better to the egg and bacon without falling apart, and they crisp more consistently when buttered.
- COOK BACON LOW AND SLOW: Skip the sizzling high-heat approach—cook bacon at 300°F (150°C) for 15-20 minutes until fully crisp. This renders fat evenly, keeps the bacon from burning, and makes it easier to crumble over the eggs later without greasy mess.
- BUTTER TOAST CUPS FIRST: Spread a thin layer of melted unsalted butter on the toast cups before adding the egg mixture. This prevents the bread from absorbing too much liquid, keeps it crisp, and adds a buttery richness that makes the whole dish taste more cohesive.
Storing and reheating this bacon egg and toast cups
Refrigerator Storage
Assembled cups (without eggs) keep beautifully in the fridge for up to 4 hours before baking. Store the toast cups and bacon separately in airtight containers—this prevents sogginess. When ready to bake, simply add the eggs and pop them in the oven. I always prep the toast cups and bacon the night before for a stress-free morning. 🥓
Freezer Prep
For long-term storage, freeze fully assembled cups (without eggs) for up to 1 month. Place parchment paper between layers in a freezer bag to prevent sticking. When ready to eat, bake straight from frozen at 375°F for 15-18 minutes—just add eggs right before baking. I double the batch and freeze half for lazy mornings. 🧊
Reheating Perfection
Reheat at 350°F for 5-7 minutes to revive crispy edges. For microwave reheating, cover with a damp paper towel and heat on 50% power for 20-30 seconds. The key is speed—don’t let the toast dry out. I prefer oven reheating for that authentic crispiness every time. ⏱️
Transport Tips
Line a tray with foil, then use it to lift cups out of the muffin tin—no mess! Store in a bento-style box for easy transport. Keep eggs separate until ready to eat to maintain that perfect runny yolk. This is my go-to for brunch on the go. 🚗
Make-Ahead Hack
Prep all components (bacon, toast cups) the day before and store separately. Assemble and bake fresh in the morning. This cuts active time to just 10 minutes—perfect for busy mornings. I call this my "lazy chef’s shortcut." 💡
Egg Safety
Never store eggs in assembled cups overnight—they can overcook or dry out. Add eggs fresh before baking to ensure that runny yolk everyone loves. If reheating leftovers, add a splash of water to keep things moist. Always reheat to 165°F for safety. 🥚
Nutrition facts
Frequently asked questions
Can I use different types of bread for these cups?
While white bread works best for that classic texture, you can try brioche for extra richness or sourdough for a heartier bite. Avoid soft breads like brioche for the base—it won't hold its shape. The key is a sturdy loaf that crisps up well when buttered and baked.
How do I keep the yolks perfectly runny?
Bake at 375°F for 12-15 minutes max—the yolks should jiggle slightly when you shake the tin. Overbaking is the #1 mistake! For extra insurance, use room-temperature eggs (they cook more evenly) and pull them out as soon as the whites are set but the tops still look slightly puffy.
Can I make these ahead of time?
Yes! Prep all components (bacon, toast cups) up to 4 hours ahead and store separately in airtight containers. Assemble and bake fresh in the morning—this cuts active time to just 10 minutes. For freezing, assemble without eggs and bake straight from frozen (add eggs right before baking).
What if my toast cups aren't crispy enough?
Double-check your butter—it should be generously brushed on both sides. Also ensure your oven is fully preheated and the tin is properly greased. For extra crispiness, bake the toast cups alone for 3-4 minutes before adding eggs and bacon. The secret is patience and that golden-brown color!
Can I add other ingredients like cheese or avocado?
Try adding shredded cheddar on top of the eggs before baking, or serve with avocado slices on the side. For a spicy kick, sprinkle with hot sauce or chili flakes after baking. Just add toppings after baking to keep the toast cups crispy.